 |
Cotton Candy Baskets
|
 |
Cotton Candy Baskets
|
![]()
|
|
![]()
![]() For
this pattern, you need to buy or dye 8 graded shades of four different cotton
candy colors (3/8 to 1/2 yard of each of 32 fabrics) and 1/4 yard of solid
black. Cherrywood Fabrics make good graduated sets, among others. To dye your
own, see the directions at:
For
this pattern, you need to buy or dye 8 graded shades of four different cotton
candy colors (3/8 to 1/2 yard of each of 32 fabrics) and 1/4 yard of solid
black. Cherrywood Fabrics make good graduated sets, among others. To dye your
own, see the directions at:
http//www.quiltchat.com/lessons/dying.html
![]() Cut
each fabric into 1" wide strips across the width of the fabric. Using a 'Little
Foot' to avoid seam allowances that could push your presser foot off, sew them
into strip sets as shown. You need to sew with a VERY accurate 1/4" seam so that
your strip sets will measure precisely 4-1/2" when sewn. Press each seam, when
sewn, toward the darker shade of fabric and your strips will lock together,
helping you sew a nice, straight strip. Plan so that each seam is sewn in the
opposite direction than the seam before it to avoid the 'growth' of one edge.
You should have at least eight each of the following strip sets (sew extra for
binding, if desired):
Cut
each fabric into 1" wide strips across the width of the fabric. Using a 'Little
Foot' to avoid seam allowances that could push your presser foot off, sew them
into strip sets as shown. You need to sew with a VERY accurate 1/4" seam so that
your strip sets will measure precisely 4-1/2" when sewn. Press each seam, when
sewn, toward the darker shade of fabric and your strips will lock together,
helping you sew a nice, straight strip. Plan so that each seam is sewn in the
opposite direction than the seam before it to avoid the 'growth' of one edge.
You should have at least eight each of the following strip sets (sew extra for
binding, if desired):


![]() Cross
cut six of each strip into 4-1/2" squares. You should have at least 60 each of
the following squares:
Cross
cut six of each strip into 4-1/2" squares. You should have at least 60 each of
the following squares:


![]() Cut
the black fabric into 4-1/2" squares. Lay your squares out as shown:
Cut
the black fabric into 4-1/2" squares. Lay your squares out as shown:


![]() Sew
these together, pressing seams so they lie in opposite directions when sewn.
Your block should measure 12-1/2" square and look like this:
Sew
these together, pressing seams so they lie in opposite directions when sewn.
Your block should measure 12-1/2" square and look like this:
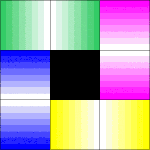
![]() Sew
the blocks into six rows of five blocks each, pressing seams so they will lie in
opposite directions when sewn. Sew the rows together, matching corners
carefully. Your top should measure 60-1/2" x 72-1/2" at this point.
Sew
the blocks into six rows of five blocks each, pressing seams so they will lie in
opposite directions when sewn. Sew the rows together, matching corners
carefully. Your top should measure 60-1/2" x 72-1/2" at this point.
![]() To
make the borders, take the two leftover strip sets of each color and re-press
one of each so that the seams lie toward the lighter shades. This is necessary
so the seams will lock together and match. Sew each color strip set into a long
strip. Cut the green and yellow strips 64-1/2" inches. Cut the pink and blue
strips 76-1/2".
To
make the borders, take the two leftover strip sets of each color and re-press
one of each so that the seams lie toward the lighter shades. This is necessary
so the seams will lock together and match. Sew each color strip set into a long
strip. Cut the green and yellow strips 64-1/2" inches. Cut the pink and blue
strips 76-1/2".
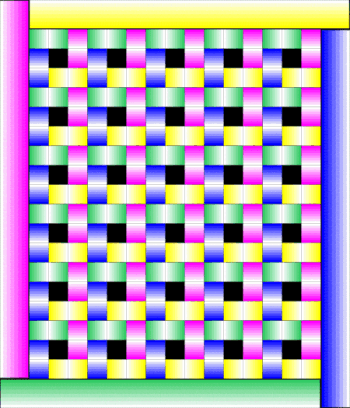
![]() Lay
the dark side of the yellow strip along the top edge of the quilt top opposite
the yellow side of the blocks (the yellow side of the blocks will be on the
bottom, while the yellow border strip is on top). Partially stitch the first
seam, leaving the last half unsewn. Now, lay the pink border strip along the
left edge of the quilt and sew the entire seam. Press the seam toward the border
and trim to square the corner if necessary. Repeat with the green strip at the
bottom and the blue strip at the right edge. Finish sewing the last seam (yellow
strip) and press. Your top should measure 68-1/2" x 80-1/2" and look like this:
Lay
the dark side of the yellow strip along the top edge of the quilt top opposite
the yellow side of the blocks (the yellow side of the blocks will be on the
bottom, while the yellow border strip is on top). Partially stitch the first
seam, leaving the last half unsewn. Now, lay the pink border strip along the
left edge of the quilt and sew the entire seam. Press the seam toward the border
and trim to square the corner if necessary. Repeat with the green strip at the
bottom and the blue strip at the right edge. Finish sewing the last seam (yellow
strip) and press. Your top should measure 68-1/2" x 80-1/2" and look like this:
![]() To
make the binding, cross cut any remaining strips (if you made extra for this),
using a rotary cutting ruler with a 45 degree line. Place this line along the
center seam and cut the strips 4" wide. Sew the bias strips together randomly or
in any pattern you like to make at least 200" of bias binding. Press this in
half lengthwise.
To
make the binding, cross cut any remaining strips (if you made extra for this),
using a rotary cutting ruler with a 45 degree line. Place this line along the
center seam and cut the strips 4" wide. Sew the bias strips together randomly or
in any pattern you like to make at least 200" of bias binding. Press this in
half lengthwise.
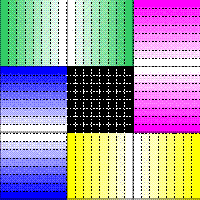
![]() Quilt
by hand or machine in the ditch of every seam, crossing right thru the black
squares (it helps to mark the lines) so that they are crosshatch quilted 1/2" in
both directions, as shown:
Quilt
by hand or machine in the ditch of every seam, crossing right thru the black
squares (it helps to mark the lines) so that they are crosshatch quilted 1/2" in
both directions, as shown:
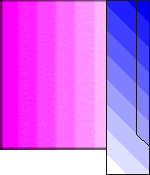
![]() Start
in the middle of one side and apply the binding to the front of the quilt,
matching raw edges and stitching 5/8" away from the edge. Stitch to within 5/8"
of the end and stitch off the corner at a 45 degree angle. as shown:
Start
in the middle of one side and apply the binding to the front of the quilt,
matching raw edges and stitching 5/8" away from the edge. Stitch to within 5/8"
of the end and stitch off the corner at a 45 degree angle. as shown:
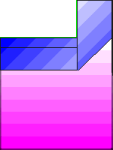
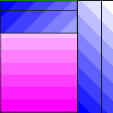
![]() Turn
the quilt 90 degrees counter-clockwise. Miter the corners by folding the binding
straight up and then back down to match the next edge and begin stitching at the
edge as shown:
Turn
the quilt 90 degrees counter-clockwise. Miter the corners by folding the binding
straight up and then back down to match the next edge and begin stitching at the
edge as shown:
![]() When
you get to within 12" of where you started, end off stitching. Overlap the ends
and mark, on the folds, a place where the two ends overlap. Open the binding and
place the ends face to face so that they are perpendicular to each other,
matching the mark. Stitch across the ends to make a 45 degree seam, as shown:
When
you get to within 12" of where you started, end off stitching. Overlap the ends
and mark, on the folds, a place where the two ends overlap. Open the binding and
place the ends face to face so that they are perpendicular to each other,
matching the mark. Stitch across the ends to make a 45 degree seam, as shown:

![]() Trim
binding seam allowance to 1/4" and press to one side. Finish stitching the
binding down. Turn the binding to the back and hand stitch down, folding the
corners to match the miter on the front.
Trim
binding seam allowance to 1/4" and press to one side. Finish stitching the
binding down. Turn the binding to the back and hand stitch down, folding the
corners to match the miter on the front.
For further information, contact:
KathKwilts@KathKwilts.com
![]()
This page has been visited times since 1/6/00.
[Click HERE for LIVE Chat NOW!!!]
[ChanOps]
[Chat]
[Stats] [Schedule] [SuperChats]
[Lessons] [Links]
[Send a Quilty Postcard to your
Friends!!!]
![]()