 |
General Quilting InstructionsFor the Beginner |
 |
General Quilting InstructionsFor the Beginner |
![]()
|
![]()
Read all directions carefully. Steps are given for several piecing and appliqué techniques. Refer to the sections which apply to your chosen project.
Pre-wash all fabrics and iron. Do not use fabric softener, as it will make your fabrics limp and harder to work with. Fabric starch can be used to make the fabric easier to work with.
![]()
Pattern templates are prepared by tracing all shapes needed for piecework on template plastic or other stiff material. Accuracy is very important.
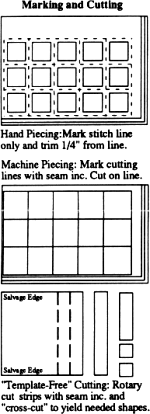
Templates are traced without the 1/4" seam allowance for traditional hand piecing and with the seam allowance included for the machine piecing approach.
When using a template, lines will be marked on to the wrong side of the fabric. The template is then removed and you will cut according to your chosen piecing method. For hand piecing you will be marking your SEWING lines on the fabric, and will cut 1/4" AWAY from these lines. For machine piecing your shapes will already include the seam allowance, and you will be marking your cutting lines. Cut directly on the lines drawn.
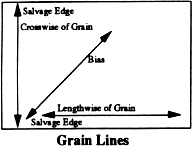
"Template-Free" cutting is done by trimming out your required shapes, with an exact 1/4" seam allowance included, using rotary cutting tools. In many cases strips of fabric will be cut, from selvage edge to selvage edge, at a determined width and then "crosscut" into rectangles, squares and triangles. Fold fabric in half, matching salvage edges, for easier cutting. With this approach, you will not need to cut a template for most shapes. Lines may then be added 1/4" IN from the cut edge for hand piecing.
![]()
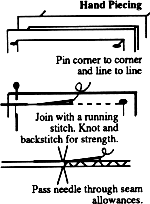
Place two shapes with their right sides together. Pin through the corners of both pieces. Match the stitching lines and place additional pins through the middle as needed.
Begin sewing right at the first corner pin. You will have a knot at the end of your thread, but it is also wise to take a backstitch after your first stitch for added strength. Sew across to the opposite corner and end with another backstitch and a knot . Add on all additional pieces in this manner.
Sew ON THE LINE at all times.
For easier piecing and pressing, DO NOT sew into the seam allowance.
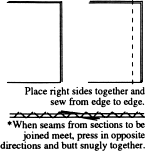
Cut all pieces with an exact 1/4" seam allowance included. There is no need to mark the stitching line on your fabric for this method. You will use the edge of your presser foot as your guide. The distance from where the needle hits the fabric to the edge of the presser foot is 1/4" on most sewing machines. Measure yours to be sure, as this 1/4" must be EXACT.
Place your first two pieces right sides together. Feed them under the presser foot, aligning the edges with the side of your foot. Sew all the way down to the opposite end, being very careful not to tug or pull on the fabrics at any time. There is no need to backstitch when piecing by machine.
Seams will always be pressed together in a chosen direction, and not open as in clothing construction.
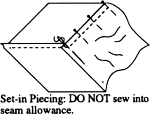
Set-in piecing, if needed, is the joining of a seam which does not travel in a straight line. Where a corner is to be "set-in," DO NOT sew into the seam allowance. Backstitch the end of the seam for strength.
![]()
Background fabric squares will be cut over-sized, appliquéd, and then trimmed. The larger starting square will allow the blocks to be "squared up," or accommodate a larger finished block size if desired upon completion.
Center the design, beneath the background fabric square, and trace with a wash-out marking pen on the right side of your fabric. Align basted appliqué shapes with these placement lines.
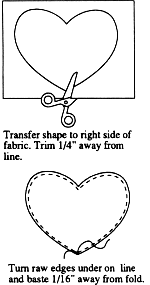
Transfer the individual appliqué shapes with a sharp lead or wash-out pencil to the RIGHT side of the fabric. This is the appliqué stitching line. Cut around the pieces 1/4" away from the appliqué line. DO NOT CUT ON THE LINE.
Fold under the raw edge of the fabric shape on the line. Clip into the fabric only when necessary. Make one clip up to line on sharp dips, as found at the top of a heart. Clip only 1/8" in on inward curves. It is not necessary to clip into an outward curve.
Baste 1/16" away from the fold with a contrasting color of quilting thread.
DO NOT baste under edges which can be trapped by another shape.
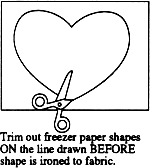
Trace the needed appliqué shapes on the dull side of freezer paper. (This paper can be found at your local grocery store.) Cut shapes out on the line that was traced. DO NOT add seam allowance. With a hot, dry iron, press the shapes, shiny or coated side down, to the WRONG side of your fabric. Hold the iron in place for about 5 seconds. The paper will now be temporarily bonded to your fabric.
Once cool, trim fabric shapes out 1/4" away from the edge of the paper. the edge of the paper now acts as the pencil line drawn on the fabric with the traditional approach.
Clip as needed and baste edges as described for previous section. Sew right through the paper, or baste in place with a fabric glue stick.
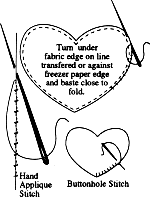
Align basted shapes on the background block. Edges which will lie underneath other shapes do not need to be sewn down. The edge which extends underneath another shape will be trapped by the overlapping piece. Baste the shape in place.
Appliqué down using an appliqué or blind hem stitch. Remove basting on each piece as appliqué is completed. Appliqué is sewn down in layers, with the shapes furthest back being sewn down first. After appliqué work is finished on the block, the excess background fabric behind each appliquéd area may be cut away leaving a 1/4" seam allowance.
NOTE: When using freezer paper, trimming is a required step to allow for the removal of the freezer paper. If a glue stick has been used for basting, it may be necessary to dampen the back side of the block with water to soften the glue for easier removal of the paper.
Prepare shapes using the freezer paper approach.
Instead of thread basting the seam allowance to the back side, use a fabric glue stick to hold the seams in place.
Pin in place.
Machine stitch using a blind hem, buttonhole, satin or other decorative stitch. Trim away the back fabric and then remove the paper. If necessary, dampen the back side of the block with water to soften glue stick for easier removal of freezer paper.
This approach will allow your appliqué shapes to have the durability of a turned under edge and a traditional "soft" look.
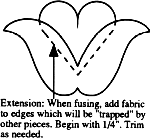
Trace designs, without seam allowance included, on the paper side of a paper backed fusible webbing such as Aleen's Hot-Stitch® or Wonder Under®.
Following the manufacturer's directions, fuse to the wrong side of your chosen fabrics. Trim shapes RIGHT ON THE LINE traced (except for edges which will lie underneath another shape). Cut all areas as smoothly as possible.
Extensions will need to be added on all edges which lie under another shape.
Lay all pieces in place and fuse to the background fabric at one time.
If desired, proceed with the decorative machine stitch of your choice to secure all raw edges as needed.
If making several of one block or pattern, you may choose to prepare a plastic template to trace. Cut out each appliqué template without the seam allowance included.
When using a decorative machine stitch to appliqué, the use of a tear-away stabilizer and "jeans" sewing machine needle is suggested.
Some images can only be used one way. For example, an "L" turned upside down is no longer an "L". When working with freezer paper or fusible webbing plan carefully since you will be tracing on their back side. This will reverse your shape. To correct this, the shape can first be traced on see-through tracing or tissue paper and then turned upside down for easy re-tracing.
![]()
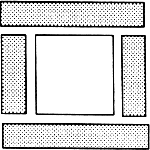
Check block(s) to see if they are square and the correct size. Make any adjustments needed before joining blocks together.
Trim appliqué blocks to their required size before adding borders; include seam allowance.
Always measure YOUR quilt top's length and width (preferable thru the middle), and adjust given dimensions to fit.
Most borders will have 2 sides added first, such as the left and right, and then the remaining two sides.
![]()
Lay the backing fabric down, with its right side facing down. Next center the batting, trimmed to the same size, on top of the backing fabric. Now place the pressed quilt top down with its right side up. Center it on the batting and backing. The batting and backing should extend beyond the edge of the top on all sides by 2 inches on a small quilt, and up to 4 inches on a larger quilt.
Baste the layers together with a contrasting color of thread.
Using the quilting thread color of your choice, favorite size quilting needle and quilt hoop/frame, you can begin quilting.
For a traditional look, quilt 1/4" away from all pieced seam lines or in the ditch. Be creative and add additional designs of your choice.
Piecework and appliqué are always enhanced by background quilting such as stippling and cross-hatching. It tends to depress the background and cause the shapes to puff up. However, the look you desire and the amount of quilting you do is totally up to you.
Cut 2-1/2" wide strips of fabric on the bias or straight of grain. Join strips end to end to achieve the length needed to travel around quilt.
Trim all edges of the quilt top evenly before binding. Baste trimmed edges together approximately 1/8" in from the outside edge with thread to match the binding fabric.
For French binding, fold strip in half lengthwise with the right side facing out. Working with the quilt top facing up, match the raw edges of the strip with the raw edges of the quilt top. Join with a 1/4" seam. Fold fabric strip to the back and appliqué to the backing fabric.
For further information, contact:
KathKwilts@KathKwilts.com
![]()
This page has been visited times since 1/6/00.
[Click HERE for LIVE Chat NOW!!!]
[ChanOps]
[Chat]
[Stats] [Schedule] [SuperChats]
[Lessons] [Links]
[Send a Quilty Postcard to your
Friends!!!]
![]()