 |
by: Kathy Somers
|

 I like things simple but accurate. Why baste if you can
pin? Why pin if you can glue? This concept led me to develop the "glue
stick method" for accurate curved piecing.
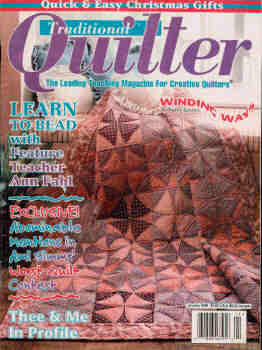
 Here are the directions for my Winding Ways Quilt, as
printed in Traditional Quilter Magazine, January 1996 issue.
 MATERIALS
 | 1/2 yd. each of eight assorted purple scraps |
 | 1/2 yd. each of eight assorted pink scraps |
 | 2-1/2 yds. of border fabric (for borders and continuous binding) |
 | 72" x 90" piece of medium weight batting |
 | 2 yds. of 90" wide backing fabric |
 | 1-1/2 yds. of binding fabric |
 | Paper, ruler, compass, pencil |
 | Template material |
 | UHU Stick color glue stick |
 | Sewing machine |
 | Basic sewing supplies |
Finished block size: 9"
Finished quilt size: 66" x 84"
DIRECTIONS
 Drafting the Pattern
- Decide on the block size you want. You will need paper three times that
size. To draft the pattern given here for a finished 9" block, you will
need a piece of paper 27" square.
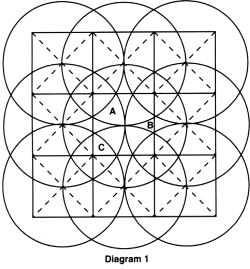
- Draw a nine patch, making each square the size of the finished block, then
lightly draw diagonal lines in both directions through all the blocks using
a ruler. The lines will intersect in the center of each block.
- Place a compass point on the center point of the center square. Set the
pencil on the center point of an adjacent square and draw a circle. Repeat
for all the squares with a total of nine circles. See Diagram 1.
- The shapes in the center square only are the template shapes. These
are labeled A, B and C. Trace to template material and add a 1/4" seam
allowance.
 Cutting
- To make alternating blocks, cut four of each template two times - once
using dark fabric and then again using light fabric.
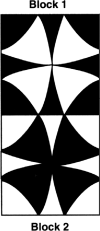
- Block No. 1 will consist of light A patches, with dark B and C patches.
- Block No. 2 will reverse or mirror the first block with dark A patches and
light B and C patches.
- Construct the quilt block on block, alternating Block No. 1 and Block No.
2. The result is a kaleidoscope effect.
Piecing
- Lay out the pieces exactly as they will be sewn.
- With the fabric glue stick, glue within the seam allowance of each piece
by tapping along the edges. Begin with the convex curves - the outward
curves found on templates A and C. The concave curves go inward or
"cave in". Color fabric glue can be seen when applied, but dries
clear and quickly and washes out completely from the completed quilt top.
- Holding the glued convex piece in your hand, take the corresponding
concave piece and match the corner seam allowance. Press the corner down
and, without stretching, bend the concave piece around, matching the edges.
Press as you align the patches. Be sure the end corner seams match. If not,
lift the edges and begin again.
- The resulting glued product will look funny, with the edge of the concave
piece appearing slightly stretched and the rest of it ruffling up. The whole
edge should be convex (curving out). Carefully peel the glued shapes from
the protective surface and sew.
- If you use pins, pin the curves together at the exact seam
allowance at the beginning and the end. Then a center pin and as many as you
need along the curved edge. Remove the pins as you sew.
Construction Tips
- Always sew with the convex piece (curves out) on the bottom next to the
feed dogs and follow the curve around as you sew.
- Consider using a seam guide or whatever it takes to consistently sew an
accurate 1/4" seam.
- Glue each piece just before sewing. Press seams toward the concave (caves
in) piece as soon as they are sewn.
- If pieces do not open out readily, moisten glue with a damp sponge. Glue
is also easily removed from the sewing machine with a damp sponge.
Block Assembly
- Sew four dark B patches to the right side of four light A patches.
- Sew two of these sets together. Repeat for the other two sets.
- Sew the two halves together, matching center seams.
- Sew four dark C patches to each of the four light patch corners. Block No.
1 is complete.
- To make Block No. 2, reverse the dark and light fabrics.
- For a 66" x 84" quilt, make 24 each of Blocks No. 1 and 2. When
you combine the blocks, alternating the colors into six blocks wide by eight
blocks long, you should have a measurement of 54-1/2" wide by
72-1/2" long.
Borders and Binding
Cut four 6-1/2" wide border strips. Cut continuous binding 4" wide
and at least 300" long (8-1/2 yds). Sew borders to the top and bottom of
the quilt and then to each side. Do not stretch the pieced quilt top as you sew
on the borders. Find the middle of the side and the middle of the border strips.
Pin the middle and each end along the side before sewing.
Mark the borders and top for quilting.
Layer, baste, and quilt. Machine sew on binding and hand finish the edge.

 Templates are provided below for the extremely lazy, but
I cannot guarantee the size of the finished block. If you are really that lazy,
download the following gif file and resize it, if necessary, so the width is
exactly 6.875" when printed. You should end up with a block approximately
9" square.

Please send questions, thoughts or suggestions to:
KathKwilts@KathKwilts.com
[Back to the Lessons Menu]

This page has been visited  times since 1/6/00.
We hope to see you soon in #QuiltChat™ !
[Click HERE for LIVE
Chat NOW!!!]
[Home] [Table of Contents]
[ChanOps]
[Chat]
[Stats] [Schedule] [SuperChats]
[Lessons] [Links]
[Send a Quilty Postcard to your
Friends!!!]
[Founder's Bio]

Page Last Modified on:
12/13/06
© KATHKWILTS 1996
(all rights reserved)


![]()
![]() I like things simple but accurate. Why baste if you can
pin? Why pin if you can glue? This concept led me to develop the "glue
stick method" for accurate curved piecing.
I like things simple but accurate. Why baste if you can
pin? Why pin if you can glue? This concept led me to develop the "glue
stick method" for accurate curved piecing.![]() Here are the directions for my Winding Ways Quilt, as
printed in Traditional Quilter Magazine, January 1996 issue.
Here are the directions for my Winding Ways Quilt, as
printed in Traditional Quilter Magazine, January 1996 issue. MATERIALS
 Drafting the Pattern
 Cutting
![]()
![]() Templates are provided below for the extremely lazy, but
I cannot guarantee the size of the finished block. If you are really that lazy,
download the following gif file and resize it, if necessary, so the width is
exactly 6.875" when printed. You should end up with a block approximately
9" square.
Templates are provided below for the extremely lazy, but
I cannot guarantee the size of the finished block. If you are really that lazy,
download the following gif file and resize it, if necessary, so the width is
exactly 6.875" when printed. You should end up with a block approximately
9" square.
![]()
times since 1/6/00.
![]()